Why WooCommerce Inventory Management Matters
If you run a WooCommerce store, inventory management isn’t optional, it’s the difference between fulfilled orders and angry customers.
WooCommerce powers over 36% of all online stores. Yet most store owners either don’t enable its built-in stock tracking or configure it incorrectly, leading to overselling, stockouts, and wasted time on manual updates.
This guide walks through the exact setup process, from enabling stock management in WooCommerce settings to handling inventory at the product level, automating notifications, and extending capabilities with plugins.
No assumptions. No skipped steps.
Who This Guide Is For
- WooCommerce store owners who want to stop manually tracking stock in spreadsheets
- New store builders setting up inventory for the first time
- Store managers migrating from another platform (Shopify, BigCommerce) to WooCommerce
- Developers configuring WooCommerce for a client
If your store has more than 10 products and you’re not using WooCommerce‘s inventory system yet, this guide is for you.
Step 1: Enable Stock Management in WooCommerce
Before anything works, you need to turn on WooCommerce’s built-in inventory tracking.
- Go to your WordPress dashboard
- Navigate to WooCommerce → Settings
- Click the Products tab at the top
- Click the Inventory sub-tab
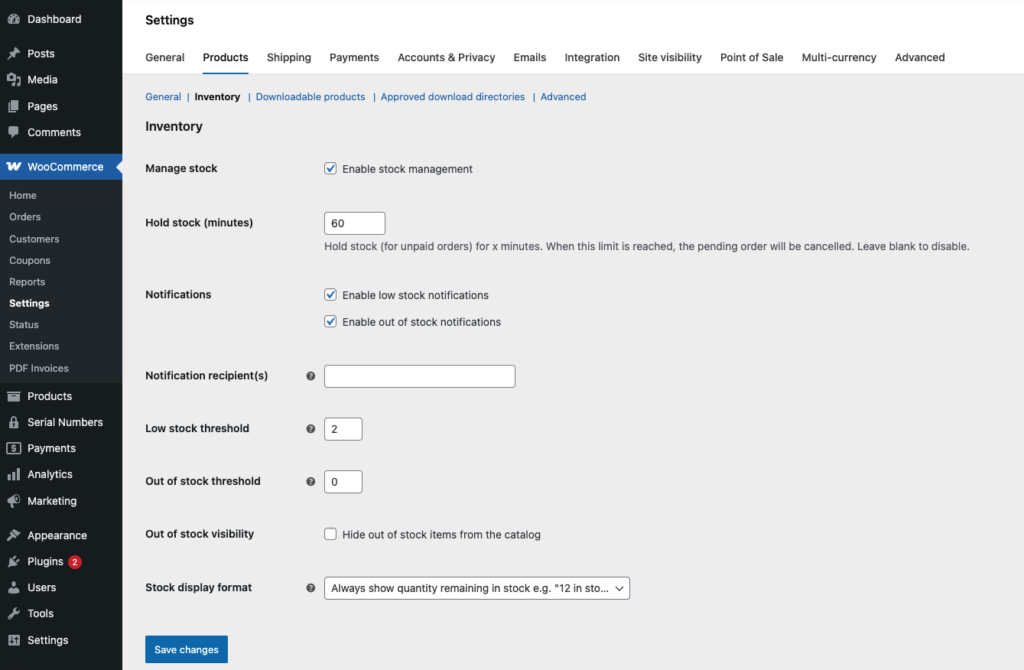
Check the box labeled “Enable stock management.”
This single checkbox activates automatic stock reduction when customers place orders. Without it, WooCommerce won’t track quantities at all.
Configure Global Inventory Settings
Once stock management is enabled, you’ll see several important settings:
Hold Stock (minutes): This controls how long WooCommerce holds inventory for unpaid orders before releasing the stock back. The default is 60 minutes. If you sell high-demand products, consider reducing this to 30 minutes to prevent stock from being tied up by abandoned carts.
Low Stock Threshold: Set a global number that triggers a “low stock” notification. For example, if you set this to 5, WooCommerce emails you when any product drops to 5 units or fewer. A good starting point is 10-20% of your typical order volume per product per week.
Out of Stock Threshold: When stock hits this number, the product is marked as out of stock. Usually set to 0.
Notification Recipients: Enter the email addresses that should receive low stock and out-of-stock alerts. Add your store manager, warehouse contact, or purchasing team, not just the admin email.
Out of Stock Visibility: Check this box to hide out-of-stock products from your store catalog. Uncheck if you want customers to see them (useful for creating urgency or accepting backorders).
Stock Display Format: Choose how customers see stock levels:
- “Always show stock” displays exact quantities (e.g., “12 in stock”)
- “Only show stock when low” shows a notice only when inventory is below the threshold
- “Never show stock” hides quantities entirely
Recommendation: For most stores, “Only show stock when low” works best. It creates urgency without revealing your full inventory to competitors.
Step 2: Configure Inventory at the Product Level

Global settings apply to all products. But WooCommerce lets you override these per product, which is essential if you sell products with different demand patterns.
- Go to Products → All Products
- Click Edit on any product
- Scroll down to the Product data box
- Click the Inventory tab
Key Per-Product Settings
Manage stock (checkbox): Check this to enable stock tracking for this specific product. If unchecked, WooCommerce ignores inventory for this item.
SKU (Stock Keeping Unit): Enter a unique identifier for this product. SKUs help you track products across systems (warehouse, accounting, shipping). Use a consistent format, for example, TSHIRT-BLU-L for a blue t-shirt in large.
Stock Quantity: Enter the current number of units available. This number decreases automatically with each sale.
Stock Status: Choose between “In stock,” “Out of stock,” or “On backorder.” WooCommerce auto-updates this based on the stock quantity, but you can override it manually if needed.
Backorders: Three options:
- “Do not allow” customers can’t order when stock is 0
- “Allow, but notify customer” customers can order, but see a notice that it’s a backorder
- “Allow” customers can order with no warning
When to use backorders: Only enable backorders if you have a reliable restocking timeline. If you can’t tell a customer when their order will ship, don’t offer backorders, it damages trust faster than being out of stock.
Sold Individually: Check this to limit customers to one unit per order. Useful for limited-edition products, trial offers, or products with shipping restrictions.
Low Stock Threshold (per-product): Override the global threshold. Set a higher number for fast-moving products and a lower number for slow sellers.
Step 3: Handle Product Variations
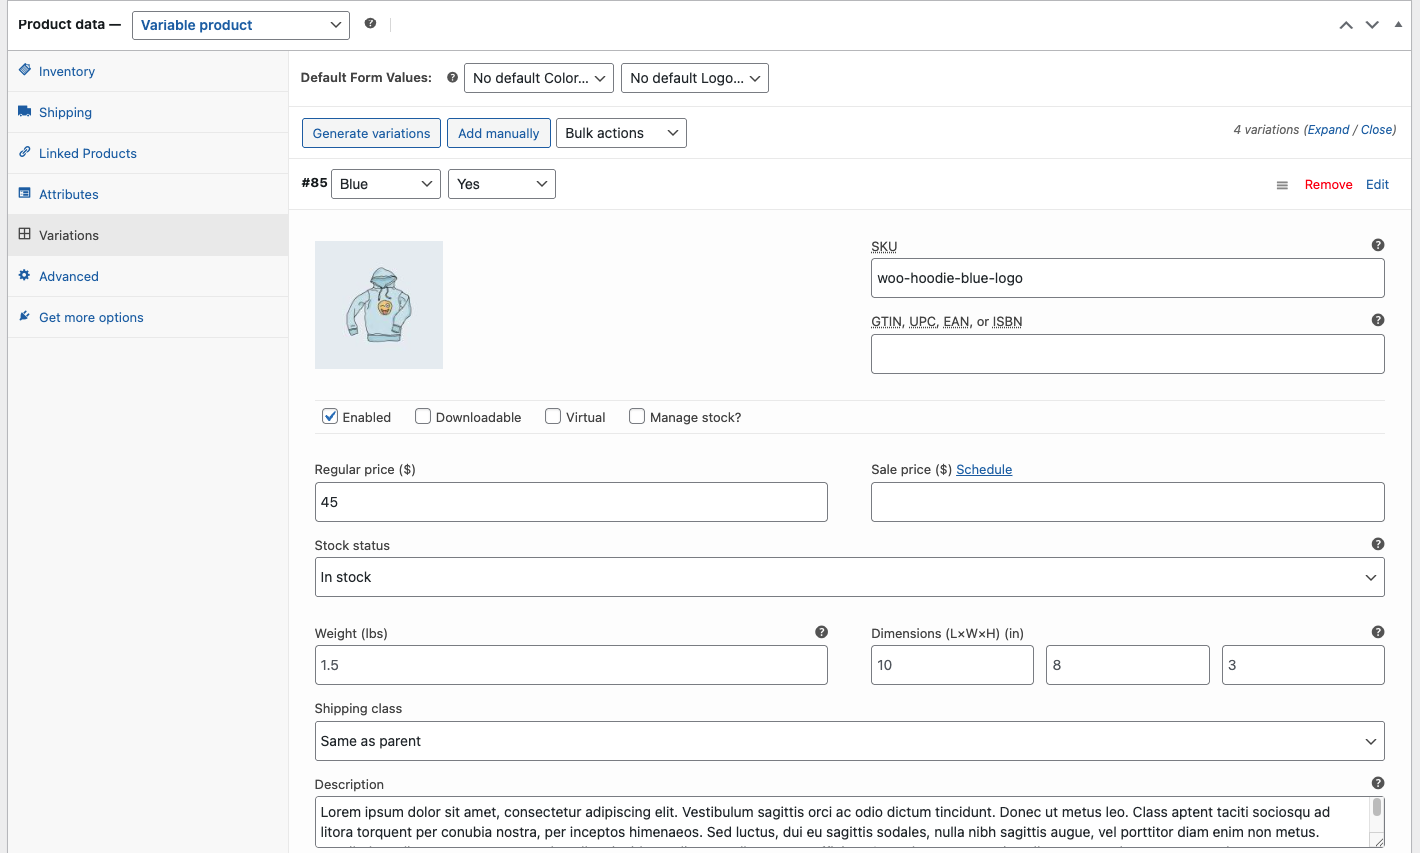
If you sell products with variations (size, color, material), each variation has its own inventory settings.
- Edit a variable product
- Go to the Variations tab in Product data
- Expand any variation
- Configure Manage stock, Stock quantity, SKU, and Backorders for each variation
Common mistake: Store owners set stock on the parent product but not on individual variations. WooCommerce tracks stock per variation, not per parent product. If you sell a shirt in 3 sizes and 4 colors, you need to set inventory for all 12 combinations individually.
Step 4: Set Up Stock Notifications
WooCommerce sends two types of stock emails automatically once you’ve enabled inventory management:
Low Stock Notification: Triggers when a product’s quantity falls below the threshold. The email includes the product name, current stock level, and a link to edit the product.
Out of Stock Notification: Triggers when a product reaches zero.
Go Beyond Default Notifications
The built-in notifications work, but they’re limited. If you’re running a serious store, consider these upgrades:
WooCommerce Stock Notifier Plugin: Sends alerts to customers when out-of-stock products become available again. This turns a stockout into a future sale.
AutomateWoo: Sends custom stock-based emails, like notifying your purchasing team when multiple products hit low stock simultaneously.
Slack/Teams Integration: Use Zapier or Make to pipe WooCommerce stock alerts directly into a Slack channel so your team sees them in real-time.
Step 5: Bulk Inventory Management
Updating stock one product at a time works for small catalogs. For larger stores, you need bulk tools.
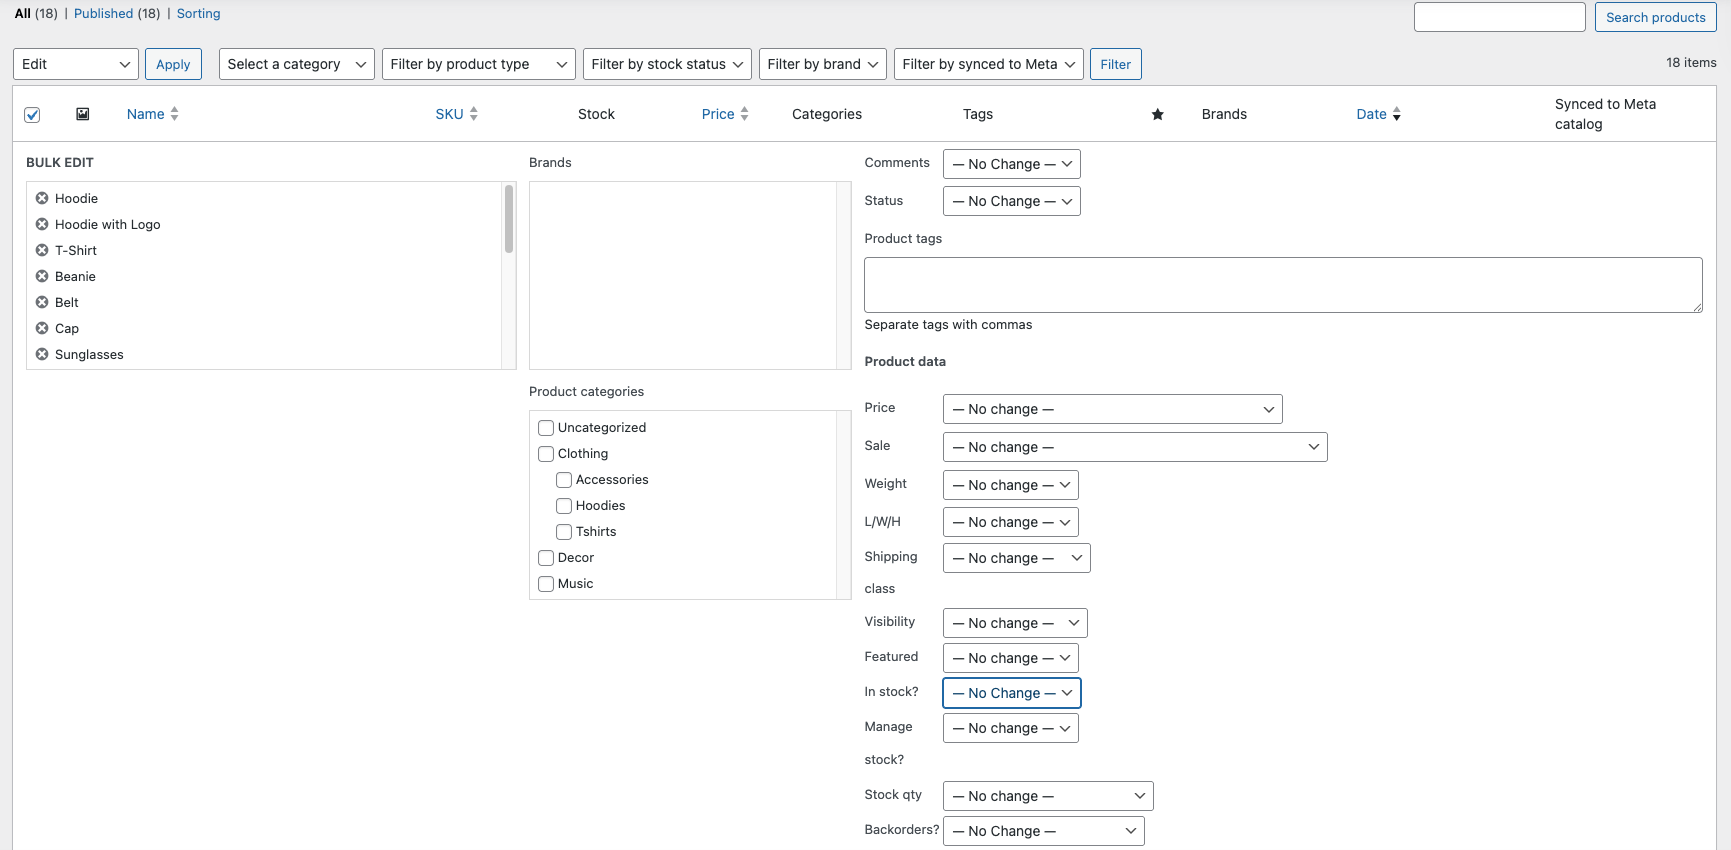
Built-in Bulk Edit
- Go to Products → All Products
- Select multiple products using checkboxes
- Choose Edit from the bulk actions dropdown
- Click Apply
- You can change stock status (in stock/out of stock) in bulk, but not stock quantities
CSV Import/Export
For actual quantity updates at scale, use WooCommerce’s built-in importer:
- Go to WooCommerce → Status → Tools
- Use the Product Importer to import a CSV with updated stock quantities
- Your CSV needs at minimum: SKU and Stock columns
Workflow for regular restocking:
- Export your product list as CSV
- Update the stock quantities in your spreadsheet
- Re-import the CSV
- WooCommerce updates all quantities in one operation
Inventory Management Plugins
When the built-in tools aren’t enough:
ATUM Inventory Management (Free): Adds a dedicated inventory management dashboard, stock counters, purchase order management, and supplier tracking. Best free option for growing stores.
Stock Manager for WooCommerce (Free): Adds a centralized stock management table where you can update quantities for all products on one screen, no clicking into individual products.
Smart Manager for WooCommerce: Spreadsheet-like interface for managing all product data including stock. Think of it as Excel for your WooCommerce store.
Step 6: Automate Inventory Updates
WooCommerce decreases stock automatically when orders come in. But it doesn’t increase stock when you receive shipments, you have to do that manually or use automation.
What WooCommerce Handles Automatically
- Decreases stock when an order is placed
- Marks products as “out of stock” when quantity hits 0
- Sends low stock and out-of-stock notifications
- Restores stock if an order is cancelled or refunded
What WooCommerce Does NOT Handle
- Increasing stock when you receive new shipments
- Tracking stock across multiple warehouses or locations
- Syncing inventory with external systems (POS, ERP, marketplace)
- Tracking raw materials or component inventory
Automation Solutions
For multi-location inventory: Use WooCommerce Multi-Inventory to track stock across warehouses, stores, or dropship locations.
For POS/ERP sync: Use plugins like WooCommerce POS or Zapier integrations to sync stock between WooCommerce and your point-of-sale or accounting system.
For marketplace sync: Use WooCommerce Amazon/TikTok Shop integration to keep stock levels synchronized across all sales channels. Selling the same product on WooCommerce and Amazon without sync leads to overselling.
For automatic restocking: Use ATUM or a custom webhook that updates stock quantities when your supplier confirms a shipment.
Step 7: Inventory Reporting and Analysis
You can’t optimize what you don’t measure. WooCommerce doesn’t include advanced inventory reports out of the box, but you can get them.
WooCommerce Analytics (Built-in)
Go to WooCommerce → Analytics → Products to see:
- Top-selling products
- Stock levels overview
- Products that are out of stock
Better Reporting Options
WooCommerce Admin (free): The newer WooCommerce dashboard includes stock overview widgets showing low stock and out-of-stock products at a glance.
Metorik: Third-party analytics tool built specifically for WooCommerce. Tracks stock levels over time, alerts you before stockouts, and provides inventory forecasting.
Google Sheets + WP Sheet Editor: Export stock data to Google Sheets for custom dashboards, trend analysis, and restocking calculations.
Key Metrics to Track
| Metric | Why It Matters |
|---|---|
| Stock turnover rate | How fast you sell through inventory |
| Days of stock remaining | When to reorder |
| Stockout frequency | Are you losing sales? |
| Backorder rate | Customer tolerance for waiting |
| Overstock percentage | Capital tied up in slow-moving products |
Common Mistakes to Avoid
Not enabling stock management at all. This is the most common mistake. Without it enabled, WooCommerce sells products regardless of actual availability.
Setting the wrong hold stock duration. If it’s too high (like 24 hours), abandoned carts tie up inventory. If it’s too low (like 5 minutes), customers who take longer to pay lose their items.
Ignoring variation-level stock. If you sell a shirt in sizes S/M/L and only track total stock (not per-size), you’ll oversell sizes that run out first.
Not syncing across sales channels. Selling on WooCommerce + Amazon + TikTok Shop without a central inventory system guarantees overselling eventually.
Skipping low stock alerts. By the time you notice a product is out of stock, you’ve already lost sales. Set thresholds so you get warned before stock hits zero.
When to Move Beyond WooCommerce’s Built-in Tools
WooCommerce’s native inventory management handles most stores up to 500-1,000 products. Beyond that, consider dedicated inventory management:
- Under 100 products: Built-in WooCommerce tools are sufficient
- 100-500 products: Add ATUM or Stock Manager plugin
- 500-2,000 products: Use a dedicated inventory plugin with purchase orders and supplier management
- 2,000+ products or multi-location: Integrate with an external inventory management system (TradeGecko, Ordoro, Cin7) via API
Quick Setup Checklist
- [ ] Enable stock management in WooCommerce → Settings → Products → Inventory
- [ ] Set hold stock duration (recommend: 30-60 minutes)
- [ ] Configure low stock threshold and notification recipients
- [ ] Enable per-product stock management for all products
- [ ] Add SKUs to every product
- [ ] Configure variation stock for variable products
- [ ] Set up backorder policy per product
- [ ] Install a bulk stock management plugin
- [ ] Set up stock notification routing (email, Slack, or Teams)
- [ ] Create a restocking workflow (CSV import or automation)
- [ ] Schedule weekly inventory review
Final Thoughts
WooCommerce inventory management isn’t complicated, but it requires deliberate setup. Most store owners skip half these steps and then wonder why they’re overselling or constantly out of stock.
Start with the built-in tools. Enable stock management. Configure thresholds. Add SKUs. Then layer on plugins and automation as your store grows.
The time you spend setting this up correctly today saves hours of manual inventory work every week, and prevents the customer service headaches that come from selling products you don’t have.
Leave a Reply
You must be logged in to post a comment.