The WC Digital Product Checkout plugin for WooCommerce is designed to simplify and enhance the checkout process for digital products, ensuring a faster and more seamless experience for your customers. This plugin provides several customization options, allowing you to restrict the checkout to digital products only, eliminate unnecessary features, and enable quick checkout buttons directly on your shop and product pages. Below is a step-by-step guide on how to configure these settings for optimal functionality:
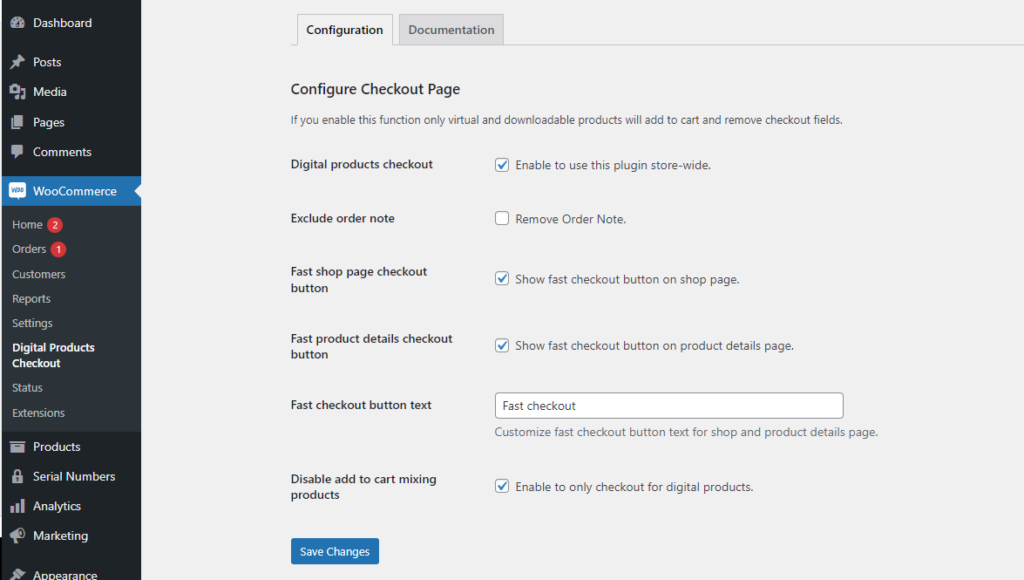
- Activate the Plugin: After activating the plugin, navigate to WooCommerce > Settings > Digital Product Checkout.
- Digital Products Checkout: Enable this option to restrict the checkout process exclusively to digital products.
- Exclude Order Note: If enabled, order notes will be disabled for digital products, streamlining the checkout process further.
- Fast Shop Page Checkout Button: Turn on this option to display a quick checkout button directly on the shop page, allowing customers to check out with a single click.
- Fast Product Details Checkout Button: Enable this option to display a quick checkout button on individual product detail pages for fast purchasing.
- Fast Checkout Button Text: Customize the text displayed on the fast checkout buttons to match your store’s branding or messaging.
- Disable Add to Cart Mixing Products: This option prevents customers from adding both digital and physical products to the same cart, keeping the checkout focused on digital items only.
- Save Settings: After configuring your options, click on the Save Changes button to apply your settings.
Block to Classic Convert
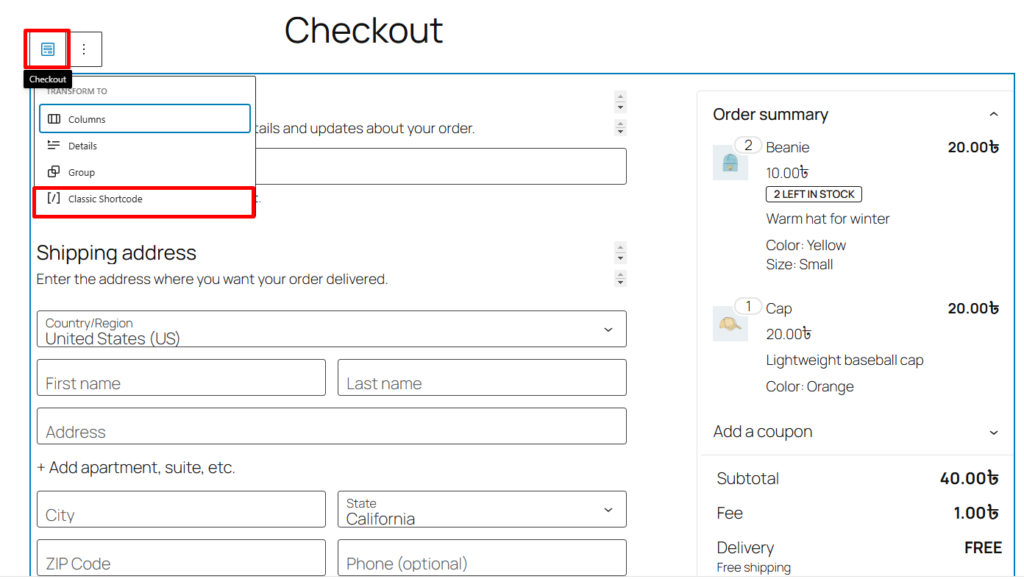
The plugin is designed to work with Classic Editor and is not compatible with the Block Editor (Gutenberg). If you are currently using the Block Editor, follow these steps to switch to the Classic Shortcode version for optimal functionality:
- Edit the Checkout Page:
Go to Pages > All Pages in your WordPress dashboard and select the page where your checkout is located. - Switch to Classic Shortcode Mode:
In the page editor, you will notice the Checkout button at the top-left corner.
Click the Checkout button, and a dropdown will appear with the option to Transform to Classic Shortcode. - Save Changes:
After selecting Classic Shortcode, click Save to apply the changes. Your page will now switch to using Classic Shortcode instead of blocks.

Note: Change Permalinks
How to Configure Permalinks:
- Navigate to Settings > Permalinks in your WordPress dashboard.
- Select Post Name under Common Settings.
- Click Save Changes.
If the permalink is not set to Post Name, the Fast Checkout Button will not work.
That’s it! You’ve successfully configured the plugin, and your store is now optimized for handling digital product checkouts.