How to Configure Additional Settings for WC Tab Manager
The WC Tab Manager provides a flexible way to manage the visibility and functionality of custom tabs across your WooCommerce store. This guide will walk you through configuring the additional settings to enhance the tab management experience.
Step 1: Accessing Additional Settings
To begin customizing the additional settings, follow these steps:
- Navigate to WC Tab Manager from your WordPress admin panel.
- Select the existing tab you want to customize or click Add New Tab to create a new tab.
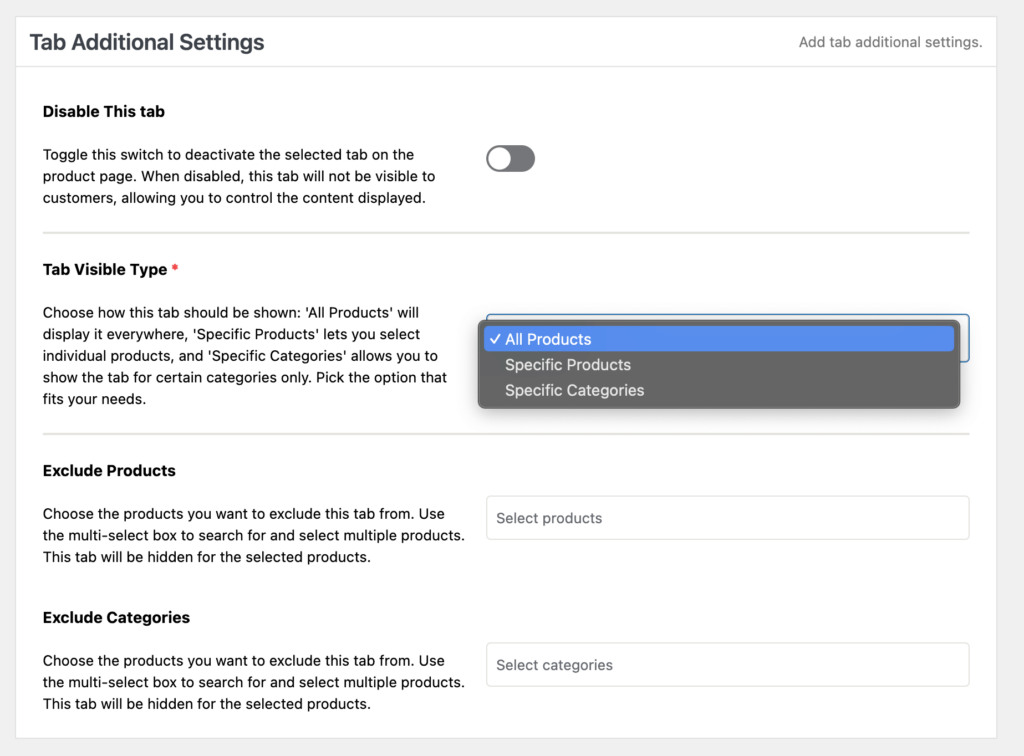
- Scroll down and You will see a section labeled Tab Additional Settings on the tab editing page.

Step 2: Customize Tab Status
The first option allows you to set the status of each custom tab.
- Enabling the tab makes it visible on the product tabs while disabling it hides the tab without deleting it.
Step 3: Select Tab Visibility Type
To have full control over where the custom tab appears on the store using the Tab Visibility Type setting. Choose from the below three options:
- All Products display the tab globally across all products.
- Specific Products display the tab on selected individual products. (Pro)
- Specific Categories display the tab on products belonging to selected categories.
3.1 Visibility for All Products
To make the tab visible on every product in your store, simply select All Products. This will apply the custom tab globally across your store.
3.2 Visibility by Specific Products (Pro)
When you choose Specific Products, you can specify the exact products where the tab should appear.
- In the Specific Products field, use the search-select functionality to find and select multiple products.
- You can select as many products as needed by typing their name and selecting them from the dropdown list.

3.3 Visibility by Specific Products
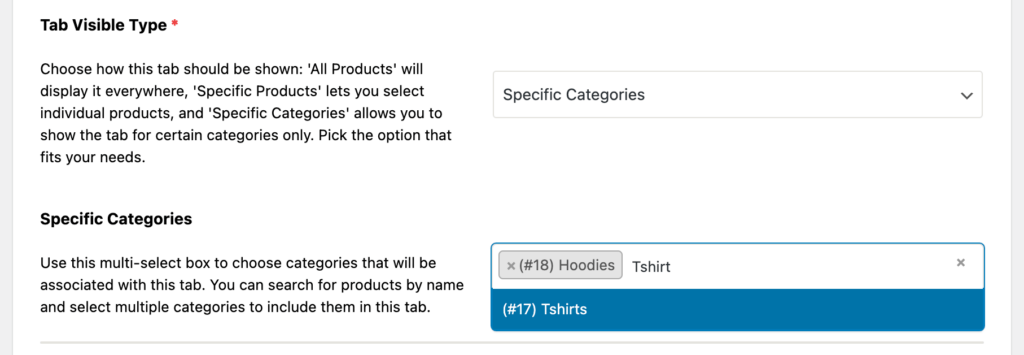
To display the tab for specific product categories, select the Specific Categories option..
- In Specific Categories, use the search-select tool to find and choose the desired product categories.
- The tab will automatically be applied to all products within the selected categories.

Step 4: Exclude Products and Categories (Pro)
To exclude specific products or categories to ensure the tab doesn’t show in those areas.
4.1 Exclude Products
To prevent the tab from appearing on certain products, even if those products match the visibility criteria.
- Under the Exclude Products option, use the search-select field to choose multiple products that you want to exclude from displaying the tab.
- Once selected, the tab will not be shown on these specific products.
4.2 Exclude Categories
Similarly, to exclude entire categories from showing the tab, even if they are included in the tab visibility settings.
- Under the Exclude Categories option, use the search-select field to select multiple categories.
- The tab will not display on any products within these excluded categories.
