Everything about API Management
First, you have to go to the Tools feature of Serial Numbers and you’ll see a tab called API Toolkit.
Click on it and you will see a form with separate two sections:
- API Validation
- API Actions (for both activation and deactivation)
API Validation
You will find a dedicated form to test the API status.
To validate your key via this form, you must first select the product from the drop-down menu. Next, input the serial number. The email box is optional, but if provided, it will be validated; otherwise, it will be ignored.
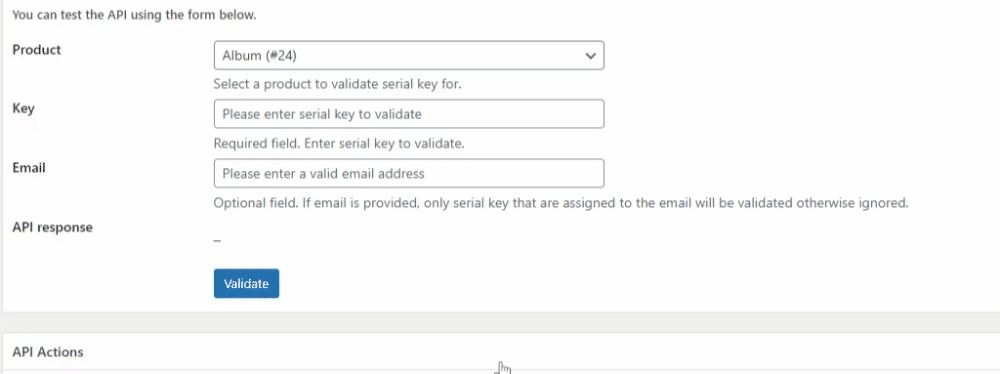
Finally, click the “Validate” button to receive the API Response for validating your license key.
Dedicated Developer Friendly Approach
To validate a serial key, you need to send a POST request to the following URL:
https://test.pluginever.com/?wc-api=serial-numbers-apiThe request must contain the following parameters:
product_id– The ID of the product for which the serial key is valid.serial_key– The serial key to validate.request– The request type. Must be set to “validate”.email– Using email is completely voluntary. The API will verify that the serial number is associated with the given email address.
Example: https://test.pluginever.com/?wc-api=serial-numbers-api&product_id=1&serial_key=123456789&request=validateThe API will return a JSON response with the following parameters:
code– The response code. If the serial key is valid, the code will be “key_valid”.message– The response message. If the serial key is valid, the message will be “Serial key is valid”.activation_limit– The activation limit for the serial key.activation_count– The number of activations for the serial key.activations_left– The number of activations left for the serial key.expire_date– The expiration date for the serial key.status– The status of the serial key.product_id– The ID of the product for which the serial key is valid.product– The name of the product for which the serial key is valid.activations– The list of activations for the serial key.
API Actions (for both activation and deactivation)
You will find a dedicated form to perform actions on license keys and also manage license key activation/deactivation through API.
To activate your license key via this form, you must first choose the right product from the drop-down option.
After that, enter the license key. You may rewrite the Instance, or it will be automatically generated.
Next, you can also add the email address for validation but this is optional.
Then, select either the Activate or Deactivate option to carry out your action.
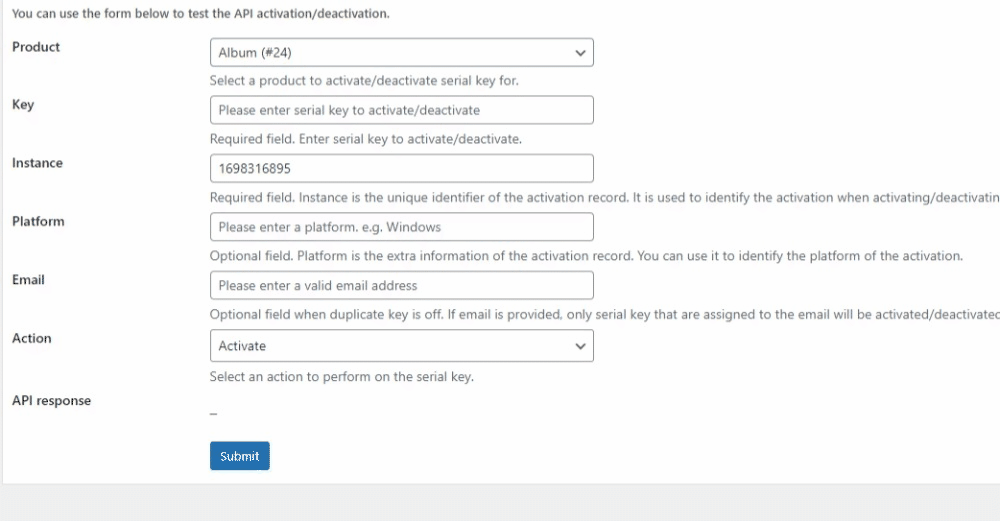
Now, click on the “Submit” button, and you will get the API Response.
Finally, to monitor your license activities, visit the Activation tab from the Serial Numbers menu. You will the activation table with detailed information about the product activation/deactivation.
Dedicated Developer Friendly Approach
You can use the API to perform actions on your website or on another website.
To perform an action, you need to send a POST request to the following URL:
https://test.pluginever.com/?wc-api=serial-numbers-apiThe request must contain the following parameters:
product_id– The ID of the product for which the serial key is valid.serial_key– The serial key to validate.request– The request type. Must be set to “activate” or “deactivate”.instance– Instance is the base of activation and deactivation. It is a unique identifier for the installation. For example, you can use the domain name of the website.platform– Optional. The platform on which the serial key is used. For example, “Windows” or “Mac”.email– Using email is completely voluntary. The API will verify that the serial number is associated with the given email address.
Example: https://test.pluginever.com/?wc-api=serial-numbers-api&product_id=123&serial_key=123456789&request=activate&instance=example.comThe API will return a JSON response with the following parameters:
code– The response code. “key_activated” or “key_deactivated” if the request was successful. “invalid_key” or “invalid_request” if the request was not successful.message– The response message. If the serial key is valid, the message will be “Serial key is valid”.activated/deactivated– Activated or deactivated when the request is successful.activation_limit– The activation limit for the serial key.activation_count– The number of activations for the serial key.activations_left– The number of activations left for the serial key.expire_date– The expiration date for the serial key.expire_at– The expiration date for the serial key in Unix timestamp format.product_id– The ID of the product for which the serial key is valid.product– The name of the product for which the serial key is valid.activations– The list of activations for the serial key.
Serial Key Validation by User (ShortCode)
We offer a convenient feature for your customers to validate their keys directly from your website. To grant access, you simply need to add the following shortcode.
Let’s take a look at how to set this up.
The shortcode to be added is [wc_serial_numbers_validation_form product_id=”0″].
Insert this into the desired page where you would like it to be displayed. If you have a single product or wish to specify a particular product, you can replace the value of product_Id with the corresponding product ID.
Now if you navigate to the relevant page, you will be presented with the following form.
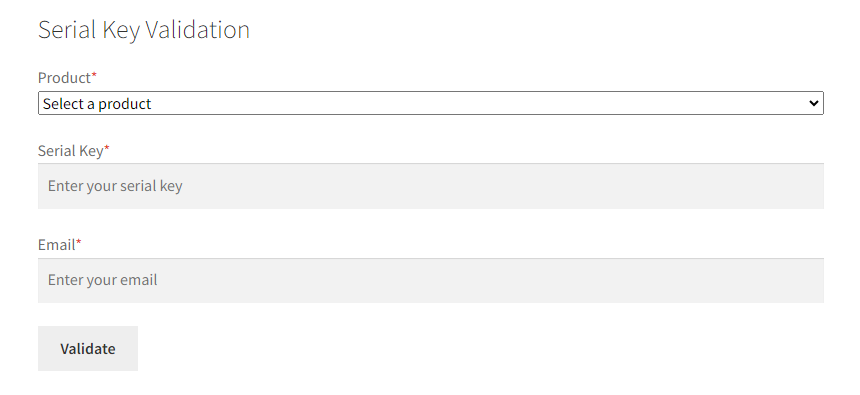
To validate through this form, customers need to select the product from the drop-down menu first. Then, enter the serial number and email address in the designated fields. All the fields are required.
Once all fields are completed and the customer clicks on the “validate” button, if all information is correct, an alert box will appear as follows.
Active/Deactivate Key by User (ShortCode)
We offer a convenient feature for your customers to Activate/Deactivate their keys directly from your website. To grant access, you simply need to add the following shortcode. Let’s take a look at how to set this up.
The shortcode to be added is [wc_serial_numbers_activation_form produt_id=”0″].
Insert this into the desired page where you would like it to be displayed.
If you have a single product or wish to specify a particular product, you can replace the value of product_Id with the corresponding product ID.
Now if you navigate to the relevant page, you will be presented with the following form.
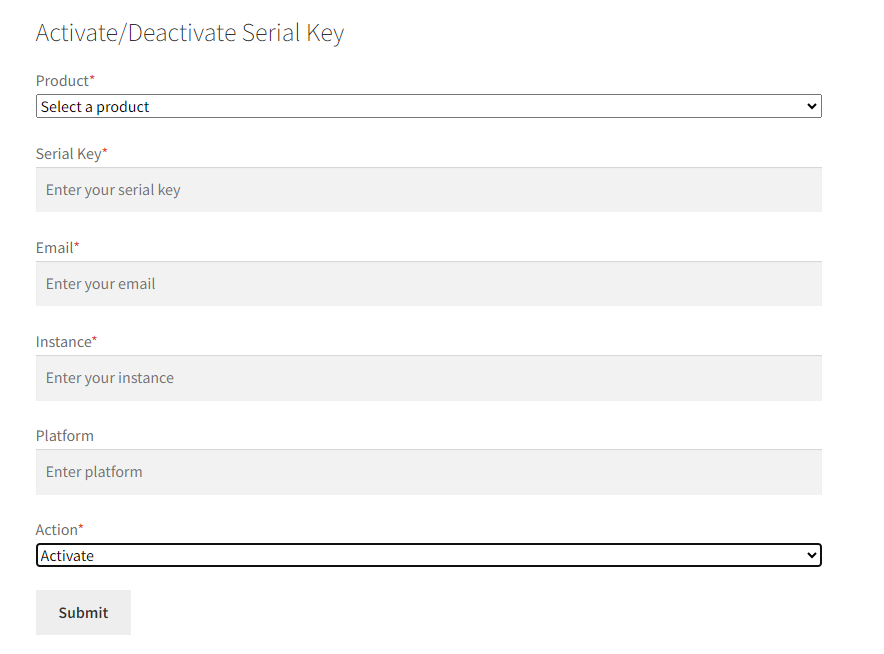
To activate through this form, customers need to select the product from the drop-down menu first. Then, enter the serial number and email address in the designated fields. Also, an Instance is required to activate/deactivate a serial key.
After that, the customer is required to select “Activate/Deactivate” from the Action drop-down. The platform field is optional.
Once all fields are completed and the customer clicks on the “Submit” button, if all information is correct, an alert box will appear as follows.
Similarly, the customer can deactivate the key.
Now click on “Submit”. if all information is correct, an alert box will appear as follows.
That’s all for now!